 Log in
  Webmail
 Select the image that represents your TV interface
Select your Phone service
Customer Portal for Business Group Administrators Quick Start Guide
- Managed Telephony Customer Portal for Business Group Administrators
- Customer Portal BG Admin Home Page
- Working with Groups
- Working with lines and phones
- Working with Business Services
- Working with Business Services
Managed Telephony Customer Portal for Business Group Administrators
Welcome to Cogeco's Managed Telephony. This guide will help get you up and running with the Customer Portal for Business Group Administrators (BG Admin). The Customer Portal BG Admin User Interface makes it possible for Business Group Administrators to view and manage the different features of their business phone service through their Customer Portal account.*
Ready to get started? (Consult your administrator regarding your default password. Once you log in, you will be prompted to create a new password.)
*This guide is representative and may vary from your individual Managed Telephony BG Admin Customer Portal screen.
Customer Portal BG Admin Home Page
A Business Group Administrator will initially see the Home page when logging into the Customer Portal BG Admin UI. The Customer Portal BG Admin UI Home page displays icons of all the services available in the Business Group as well as a scrollable left-hand sidebar, both of which provide links to screens where the BG Administrator can view and configure each service.

The left-hand sidebar also includes the following links.
Help
The BG Admin can click on this link to see information about the options on the particular page they are currently viewing.
Send Feedback
The BG Admin can use this link to send feedback if they encounter problems using the Customer Portal BG Admin UI.
Working with Groups
Hunt Groups (MLHGs)
BG Administrators can view and change the settings for any Hunt Groups (MLHGs) in their Business Group or Department. A Hunt Group (also referred to as a Multi Line Hunt Group or MLHG) is a collection of Business Group lines. Calls to a Hunt Group are passed to the first non-busy line in the group or to all non-busy lines simultaneously. If all lines are busy, then the caller is added to a queue. A Hunt Group may be used to create a small Call Center.
If you are using Cogeco's Integrated ACD product, you may configure this service on a maximum of 10 Hunt Groups in a single Business Group. The Hunt Groups page lists all of the Hunt Groups in the Business Group or selected department (not including those in sub-departments).
If you are using Cogeco's Integrated ACD product in one or more Hunt Group in a Business Group, this screen will also display the Service Level to indicate whether this Hunt Group can use either the Integrated ACD Basic and/or Premium service. If there is a limit on the number of licenses which can be used in the Business Group, the BG Admin will also be able to see how many ACD Basic and/or Premium licenses are currently available for use in this Business Group or Department.
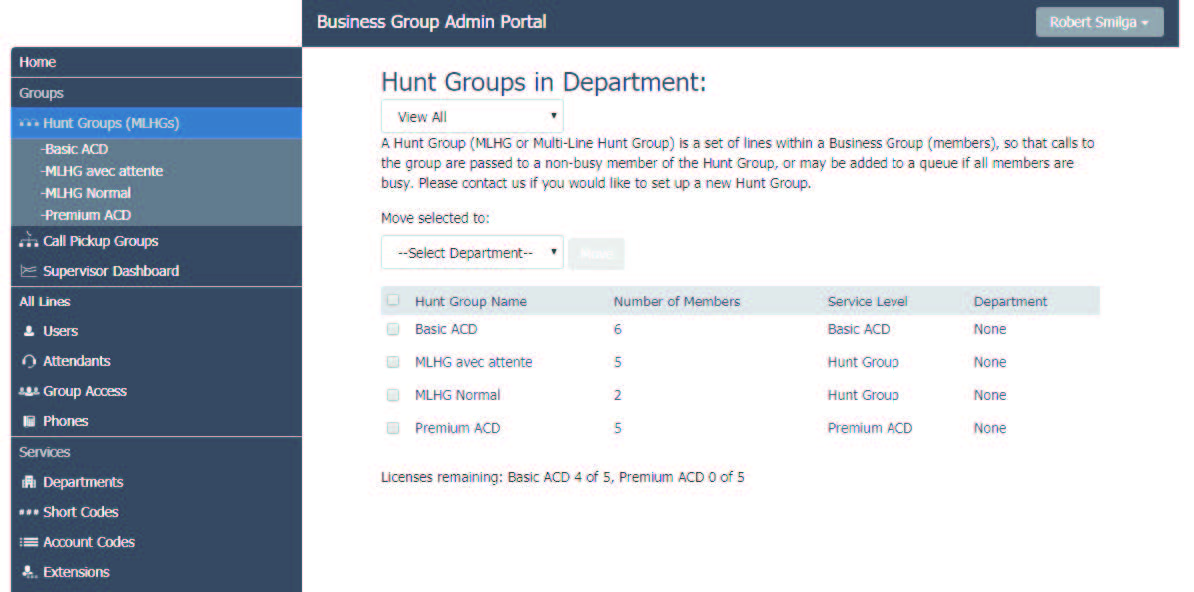
On this screen, the BG Administrator can:
- select one or more Hunt Groups using the checkboxes and move the selected Hunt Group(s) between departments using the drop-down.
- click on a Hunt Group to access the configuration screen for that Hunt Group.
On the configuration screen for an individual Hunt Group, the BG Admin can:
- view details of Hunt Group Pilots and Hunt Group Members and access the configuration options for the member lines in the Hunt Group.
- add or remove member lines, or change the position of member lines within the group.
- change settings, including
- the name of the Hunt Group;
- whether new members can explicitly log in or log out of it by default;
- the call distribution algorithms.
Call Pickup Groups
BG Administrators can view and change the settings for any Call Pickup Groups in their Business Group or Department. Incoming calls to a Business Group Line that is a member of a Call Pickup Group can be answered by any other member of the Call Pickup group, who simply presses a key to connect to that call. The Call Pickup Groups page lists all of the Call Pickup Groups in the Business Group fragment or selected department (not including those in sub-departments).
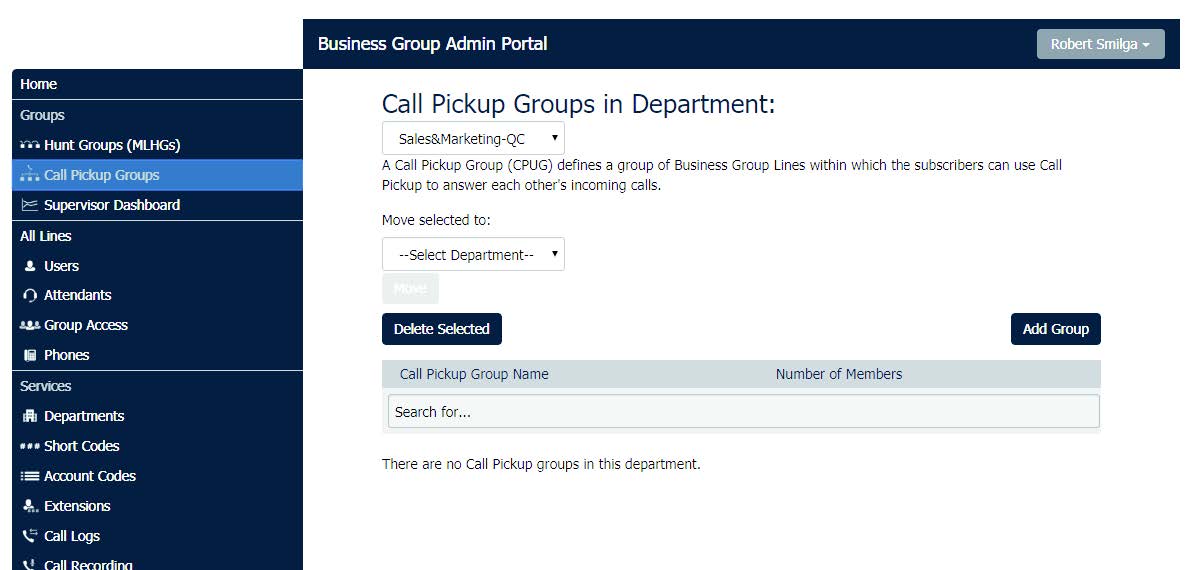
On this screen, the BG Admin can:
- view all the currently-configured Call Pickup Groups
- add or delete Call Pickup Groups
- click on a Call Pickup Group to access the configuration screen for that Call Pickup Group
On the Call Pickup Group Configuration screen, the BG Admin can:
- add or remove lines from the Call Pickup Group
- access the configuration options for the member lines in the Call Pickup Group
Supervisor Dashboard
If your deployment includes Integrated ACD, BG Admins who are also ACD Supervisors can access the Supervisor Dashboard directly the Customer Portal BG Admin UI. Integrated ACD (Automated Call Distribution) is a separately-licensed Customer Portal component that provides BG Administrators with detailed information about the activity of the MLHGs that they are managing.
If the BG Admin is also an ACD Supervisor, they will see the Supervisor Dashboard link on the Customer Portal BG Admin UI. Clicking this link launches a new browser window that enables the administrator to view a range of graphs for all the MLHGs that they administer (Department Administrators will only see their department and, if configured, sub-departments).
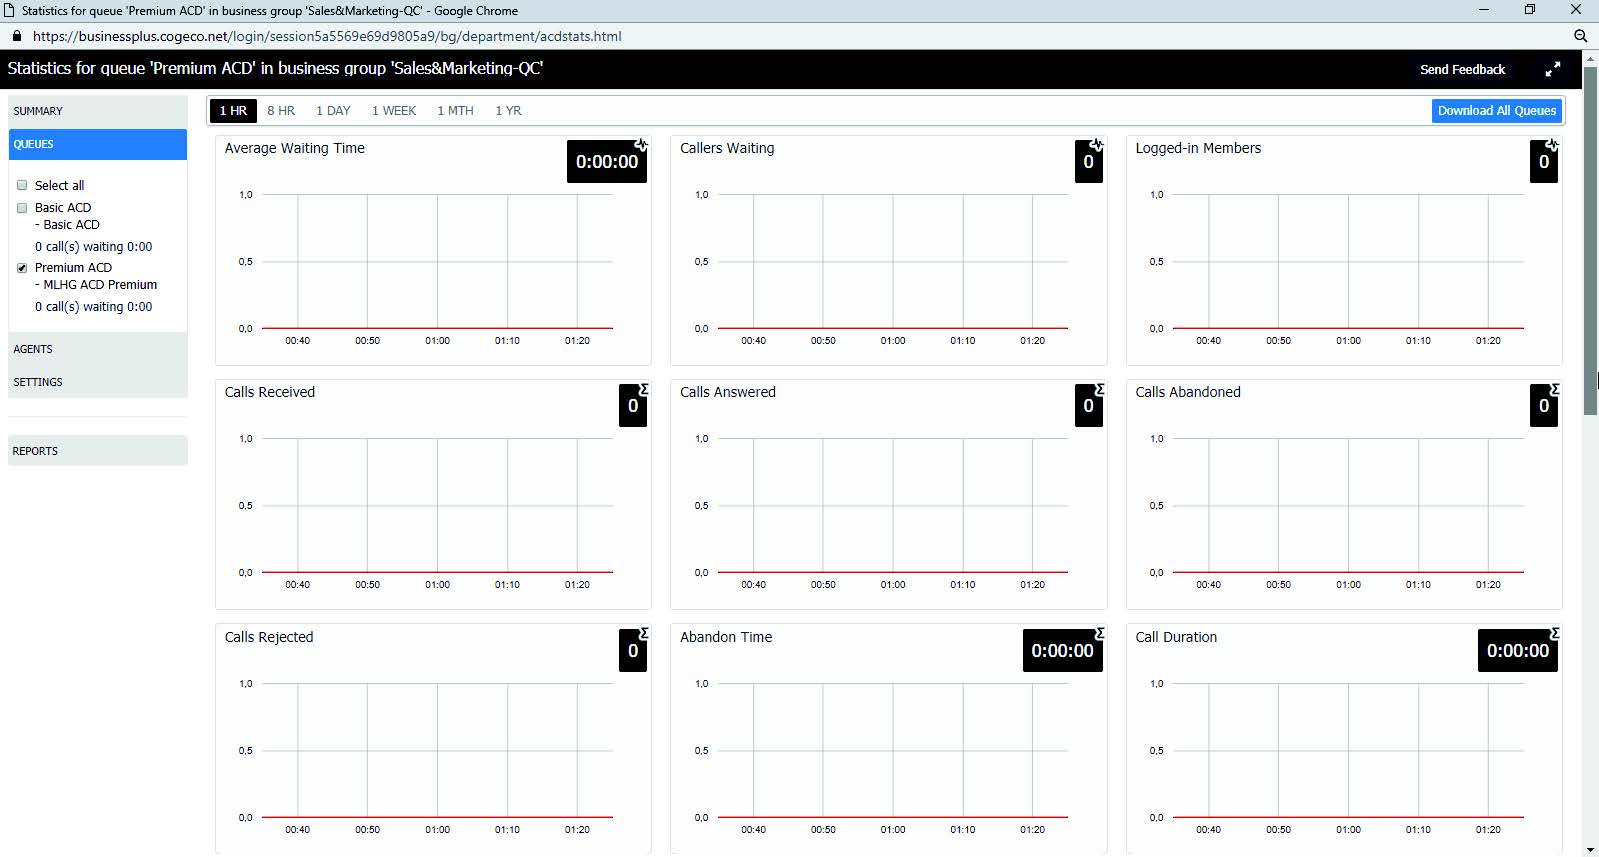
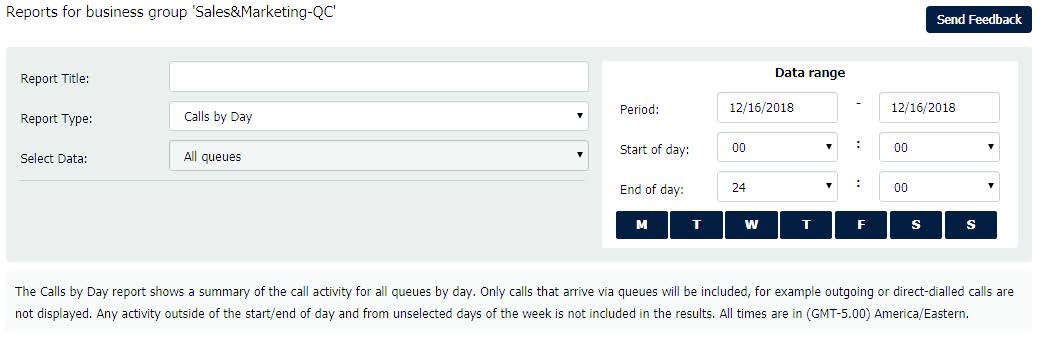
BG Administrators who are also ACD Supervisors will also be able to use this screen to launch the ACD Report Scheduler to generate and schedule reports on MLHG activity.
Working with lines and phones
Business Group and Department Lines
BG Administrators can view and change the settings for all the lines in their Business Group or Department. The Lines page displays all the lines in the selected Department, using icons to indicate lines of a particular type. The BG Admin can also click on the following links to view screens that only contain lines of a particular type.
- The Users screen displays all individual Business Group lines (see Appendix for detailed settings examples)
- The Attendants screen displays any lines configured as Easy Attendant or Premium Attendant lines (see Appendix for detailed settings examples)
- The Groups screen displays any lines configured as Hunt Group Pilot lines.
There are a range of options on these pages. On the main Lines page, the BG Admin can use the Download all Lines button to download a CSV file which contains information about all the lines in this Business Group. This CSV file contains the name, DN and department of each line, ordered by the department to which the lines belong.
On all the pages, the BG Admin can use the Search for text box to search for any value in the table to find a particular line.
- The search will be restricted to the Department selected at the top of the screen. Selecting View All opens a drop-down which displays a list of all the Departments currently configured in the Business Group, along with a search facility. When the View All option is selected, a Department column is shown in the results table so that the administrator can easily see where the line is located.
- The drop-down box on the right of the search field enables the BG Administrator to specify whether the search should be applied either in any field or just to a specific column.
- The information of each column will be checked against the characters entered in the textbox, and just the lines that have matches are shown with the relevant matches highlighted. The list is updated as the characters are entered.
- The BG Administrator can also use the search facility to list all the administrators in the selected Department, by entering admin in the search textbox.
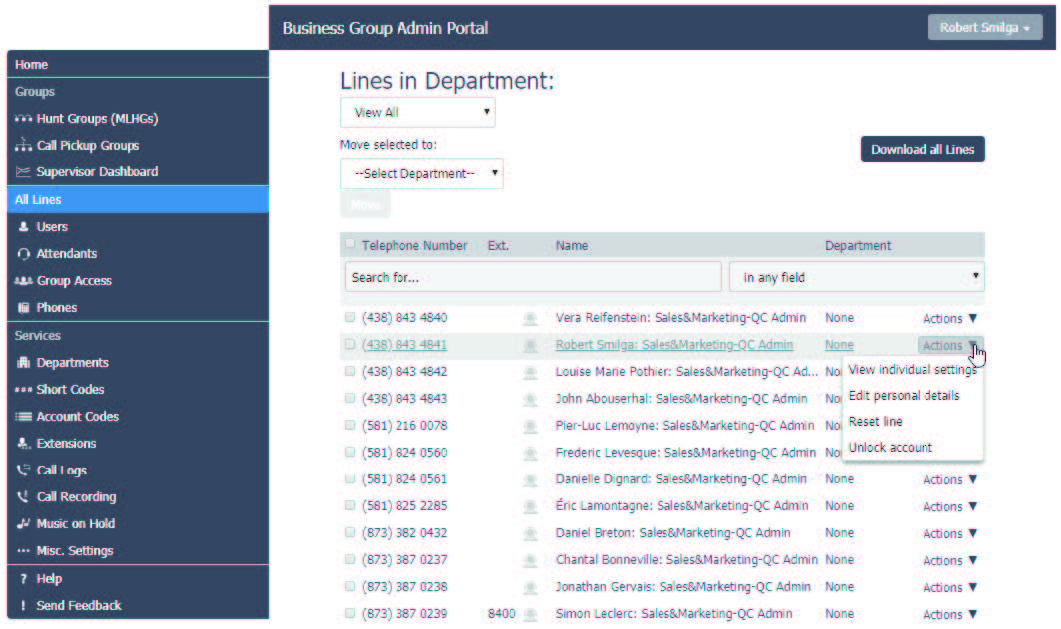
The BG Admin can use the Actions dropdown alongside a line to
- View individual settings for that line.
- Edit personal details for that line, including changing the name and designating the line as a BG Administrator.
- Reset line. Clicking this link enables the BG Administrator to allocate this line to a different subscriber.
- Unlock account. Clicking this link enables the BG Administrator to unlock a line. For example, if a subscriber has incorrectly entered their PIN or password multiple times and been locked out, or a BG Administrator has previously locked the line so that it cannot be used. This option is only displayed if the action to unlock an account is enabled in the Customer Portal customization.
Resetting a Business Group Line
Attention: Resetting an account is a significant change that takes a few seconds to complete, and cannot be reversed. The existing account is stripped—all messages and contacts are deleted, personal settings and schedules are removed and service options are returned to the Class of Service values. Subscribed services are still available, but may be disabled awaiting reactivation by the new subscriber.
The Reset Line option allows the BG Administrator to allocate the selected line to a different subscriber. Resetting a line removes all the current data associated with the line, including any call lists.
- To reset a line, the BG Administrator clicks the Reset line link on the Actions menu drop-down.
- This launches a pop-up where the BG Administrator can enter the following information.
- The new account name.
- Whether to use the account name as the local calling name (this option is ticked by default).
- Whether to remove the line from all groups (this option is ticked by default).
- The BG Administrator then clicks OK. They will see a confirmation pop-up warning them that this action will lose all data for the line and cannot be undone. Clicking OK resets the line.
- The BG Administrator then sees a New User Details pop-up showing the new account name, directory number and all PINs/passwords. These passwords will be set to randomly generated numeric or alphanumeric sequences.
- The BG Administrator can then copy and paste this information into an email and send it to the new user.
- The new account will be uninitialized, and the subscriber will need to set a new TUI PIN/Customer Portal password and record a spoken name and initial greeting when they log in for the first time.
Business Group Phones
BG Administrators can assign phones to lines in the Department or Business Group, and click a link to launch the Customer Portal Phone Configurator where they can view and make changes to phone profiles. The Phones page lists all the SIP phones in the Business Group or Business Group fragment or selected department.
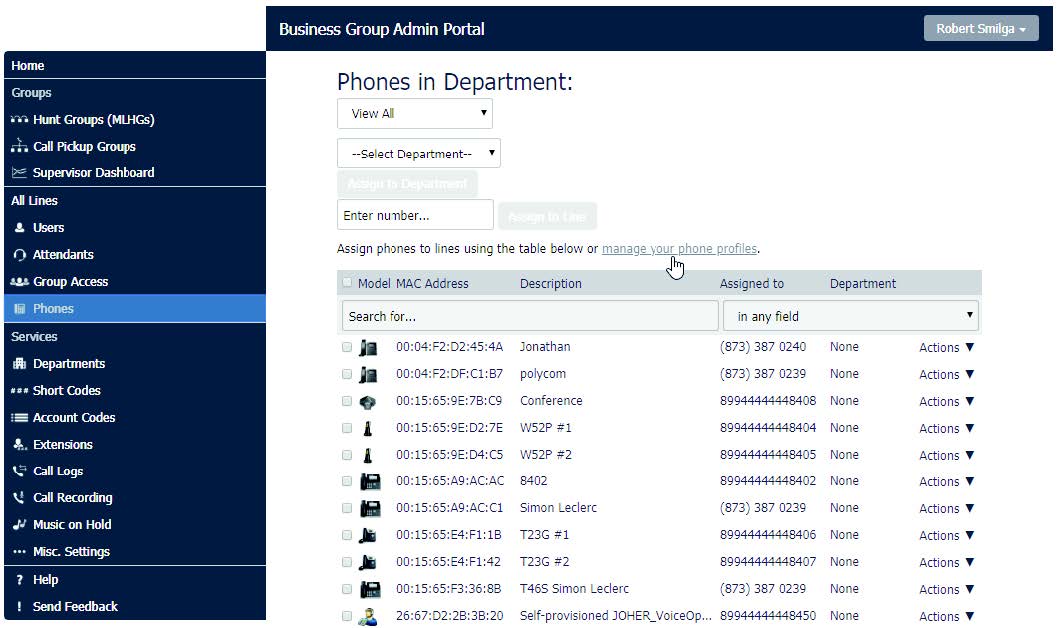
The BG Admin can:
- view the status of all the phones in the selected Department - the question mark icon indicates if a phone is not currently able to be used, for example because the phone has not been authenticated.
- use the checkbox to select a phone or click on the phone and then assign it to a department or line.
- click on the phone icon to launch a pop-up to change the phone configuration.
- click on the Actions menu to change or configure the phone (see Appendix for detailed settings examples).
- click on manage your phone profiles to launch the Customer Portal Phone Configurator.
Working with Business Services
Business Group Departments
The BG Administrator can make changes to the configuration for all the Departments for which they are administrators. On the Departments screen, the BG Administrator can view details of all the Departments for which they are an administrator, and also add new departments.
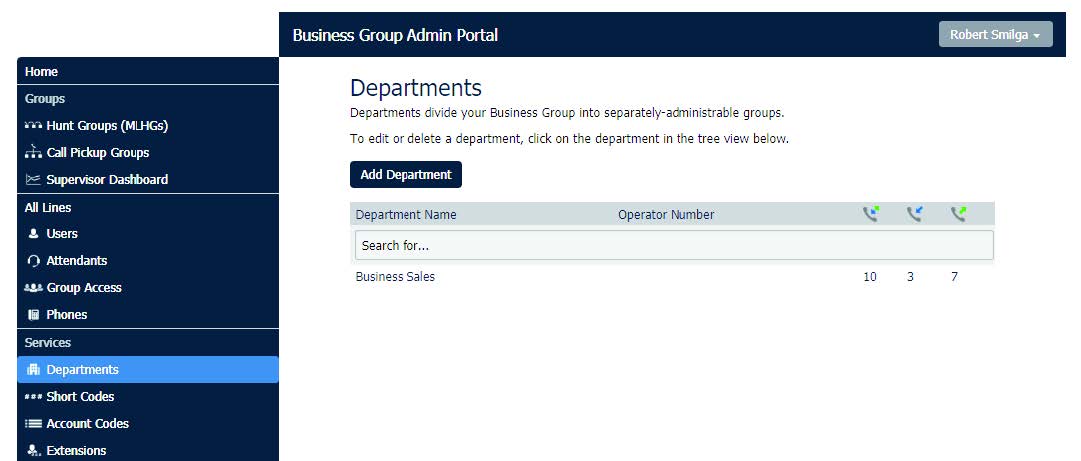
The BG Admin can click on any of the existing departments on this screen to launch a pop-up where they can:
- rename the department
- enter or change the operator number for the department
- set limits on the number of incoming and outgoing calls that the department can make
Business Group Short Codes
The BG Administrator can view and make changes to the short codes used in a Department or Business Group. Short Codes allow subscribers to call a number by dialing the short code rather than the whole number. On the Short Codes screen, the BG Admin can see all of the Short Codes in the Business Group fragment or selected department (not including those in sub-departments).
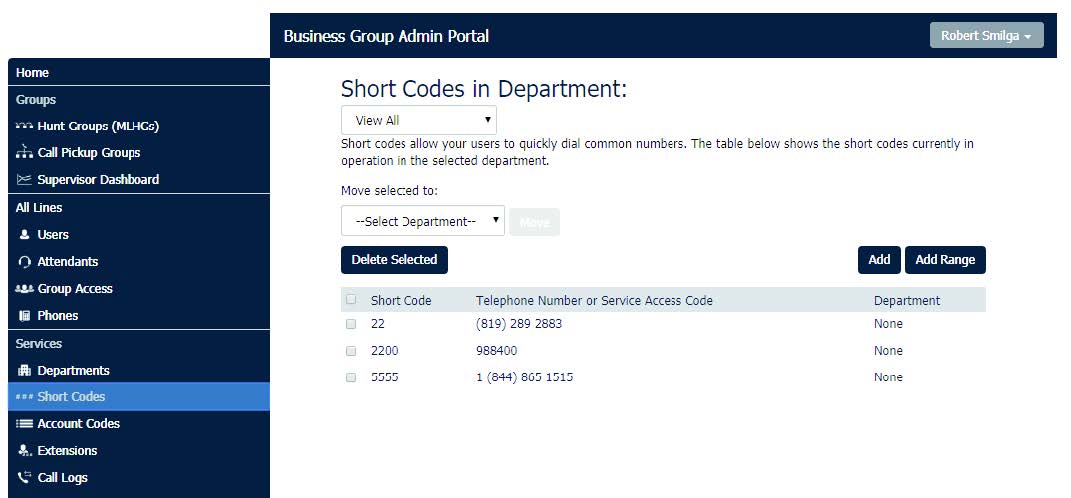
The BG Admin can:
- move a selected Short Code to another Department
- select a Short Code and delete it
- add a single Short Code or a range of Short Codes
- click on an existing Short Code to launch a pop-up where they can edit it
Business Group Account Codes
The BG Administrator can configure the Business Group's Account Code settings, and create and edit a list of Validated Account Codes.
On the Account Codes screen, the BG Administrator can see which types of call require an account code to be entered before they can be made, and, if account codes have been assigned, a list of these account codes.
Note: Only the BG Administrator for the whole Business Group fragment can access the Account Codes page.
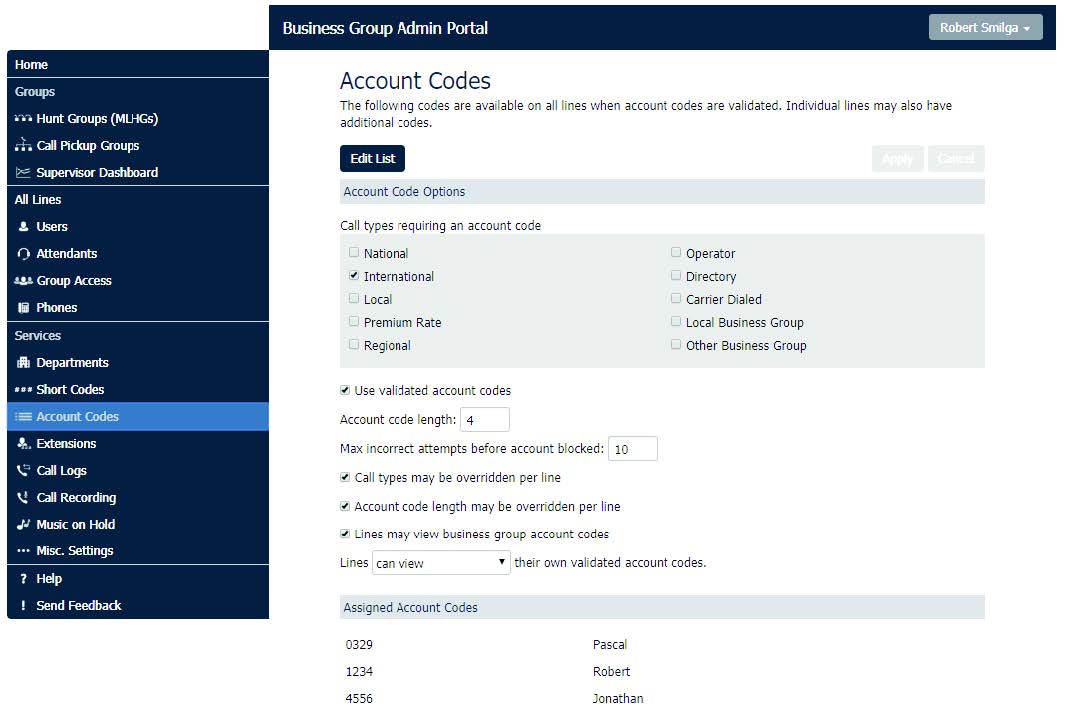
On this screen, the BG Admin can
- edit the list of assigned account codes
- use the checkboxes to mark which call types require account codes
- choose whether or not to use validated account codes (so that subscribers must enter a specific code before making a call of a particular type)
- set the account code length (1-15 characters)
- set the maximum number of incorrect attempts to enter an account code before the account is blocked (1-100 attempts)
- choose whether or not call types and Account Code length can be overridden on a per line basis
- choose whether or not Business Group Lines can view and change their own account codes
Business Group Extensions
The BG Administrator can view and configure the extensions that can be used in their Business Group or Department.
On the Extensions screen, the BG Administrator can see all the extensions that are currently configured in the Business Group or Department. These extensions can be used to quickly dial other numbers in the Business Group.
Note: Only the BG Administrator for the whole Business Group fragment can access the Extensions page.
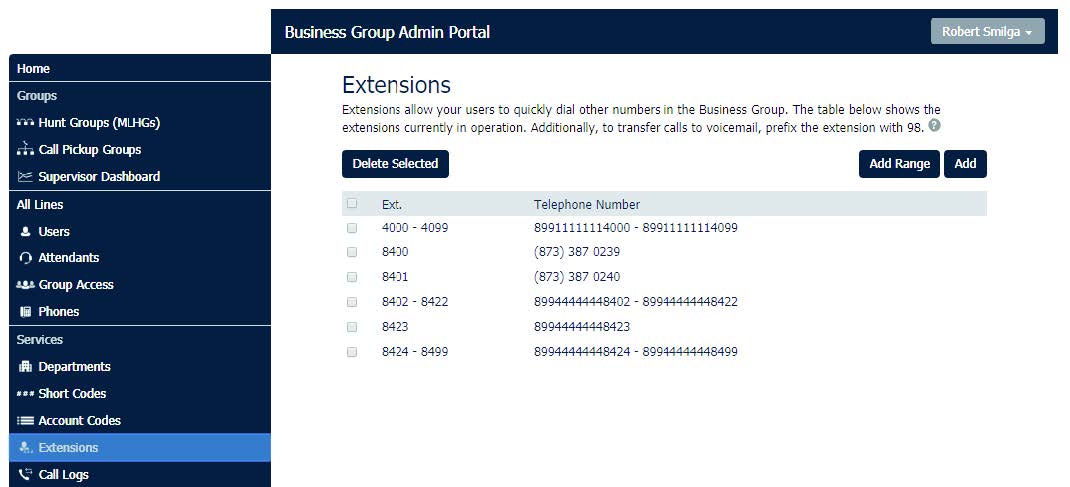
On this screen, the BG Admin can
- delete selected extensions
- add a single extension, or a range of extensions
- click on an extension to launch a pop-up where they can edit it
Business Group Call Logs
BG Administrators with the appropriate permissions can download Call Logs for a specific period of time.
Note: Only BG Administrators with suitable permissions can see the Call Logs screen.
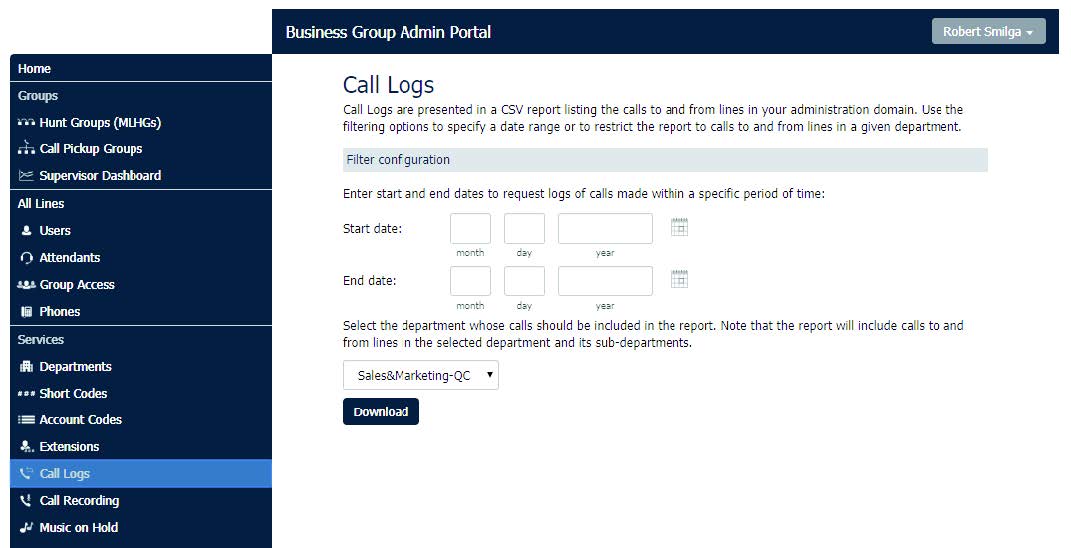
On the Call Logs screen, the BG Admin can:
- request a report containing the logs of all calls made (up to a month at a time) to and from lines within their administration domain (whole business group or department and sub-departments).
- filter call logs specifying a date range, and/or by department domain if the Business Group has them.
Error messages are displayed if any of these filters are set to incorrect values.
The UI will validate these filters once the Download button is clicked, and then display a dialog box while the report downloads. The BG Admin cannot access the main page or navigate to another page during this process, although they can cancel the operation. Once downloaded, the report can be opened in a spreadsheet application such as Microsoft Excel.
Business Group Call Recording
The BG Administrator can click on the Call Recording menu button to access the default Call Recording Server where they can configure their call recording service.
Note: The Call Recording tab is only visible if Call Recording is enabled for the Business Group.
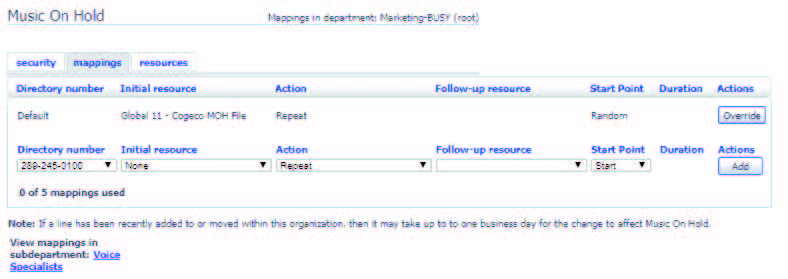
Business Group Music on Hold
The BG Administrator can access configuration pages for Music on Hold directly from within the Customer Portal BG Admin UI.
The BG Administrator can click on the Music on Hold link to configure this service. This will open a new window containing the appropriate configuration interface.
Business Group Miscellaneous Settings
The BG Administrator can use the Misc. Settings screens to view a range of settings for their Business Group or Department. On the Misc Settings screen, the BG Admin can see the Number Blocks screen, and click additional tabs to view External Call, Call Notifications and Other Settings screens.
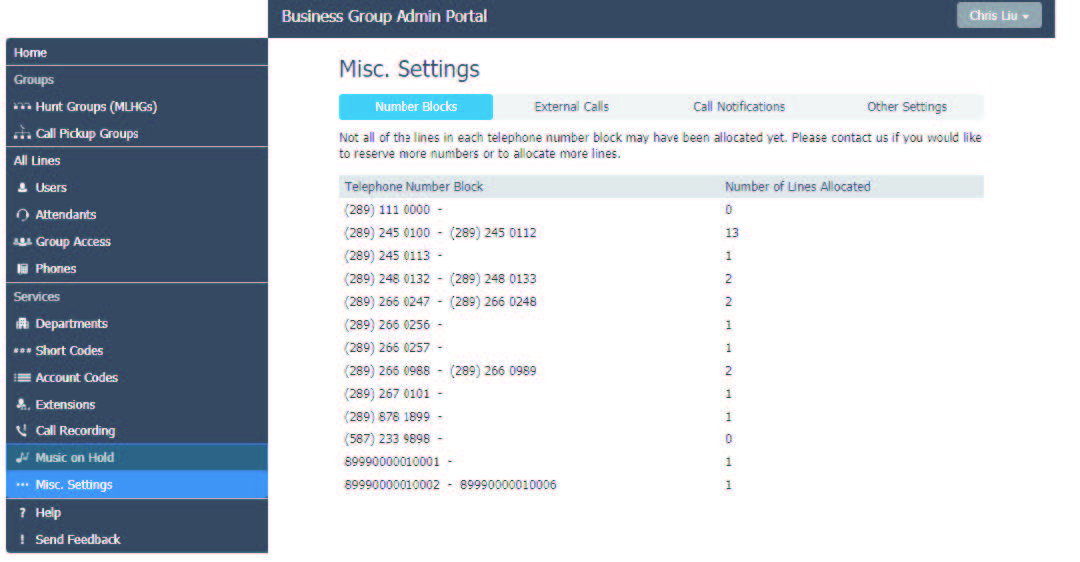
Number Blocks
On the Number Blocks screen, the BG Admin can see a list of the Telephone Number Blocks in their Department or Business Group, and the number of lines that are currently allocated in each block.
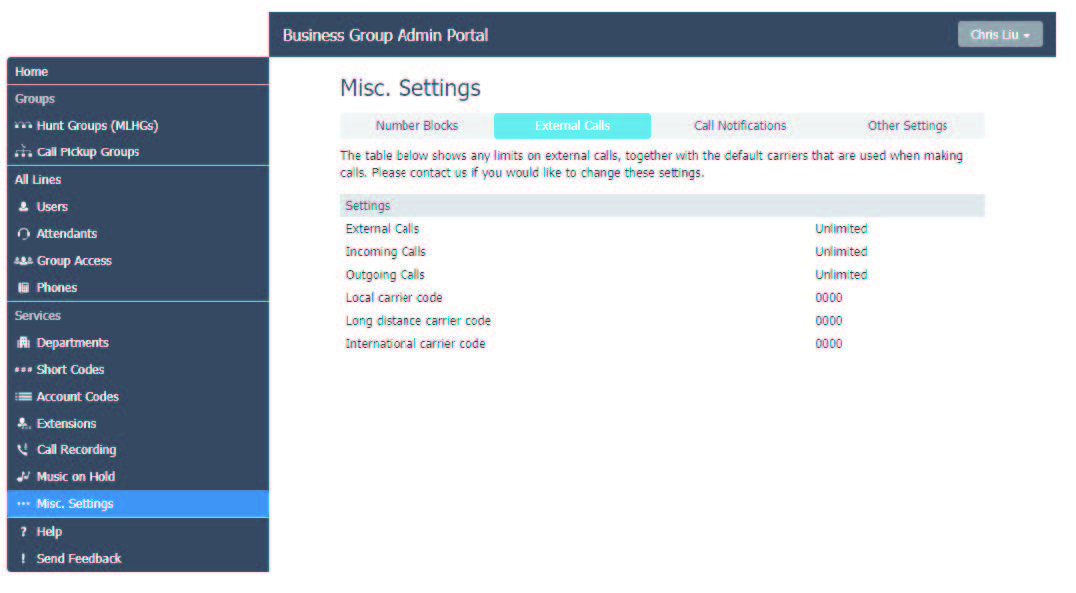
External Calls
On the External Calls screen, the BG Admin can see if there are any limits on calls made outside of the Business Group or Department as well as the codes set for local, long distance and international carriers.
Call Notifications
The BG Administrator can use the Call Notifications screen to enable or disable Emergency Call Notifications and, if these notifications are enabled, configure the targets who will receive either an email or outdial notification whenever an emergency call is made by one of the lines in the Business Group.
Note: The Call Notifications tab is only visible if the Business Group is subscribed to the Outgoing Calls Notifications service.
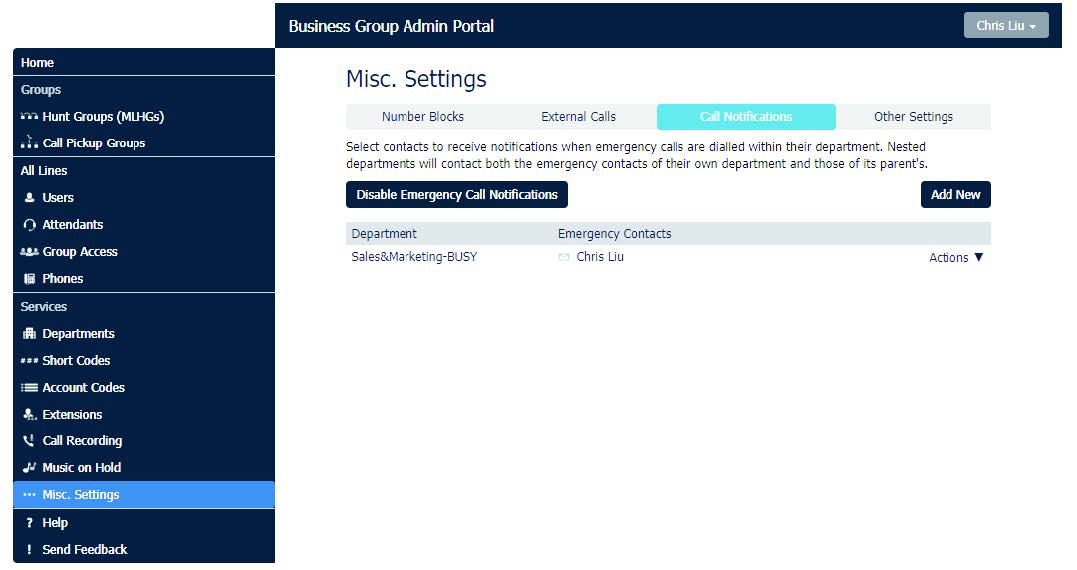
The BG Administrator can click Disable Emergency Call Notifications to turn call notifications off. When Call Notifications are disabled, this button displays Enable Emergency Call Notifications.
On this screen, the BG Admin can:
- view the Call Notifications which are already configured.
- use the Add New button to launch a pop-up where they can select a Department and add details for the recipients who should receive either an email or a telephone call whenever a line in that Department makes an emergency call.
- use the Actions drop-down alongside a Department to edit the existing lists for that Department or to clear them. Clicking on Edit launches the same pop-up as the Add New button.
Other Settings
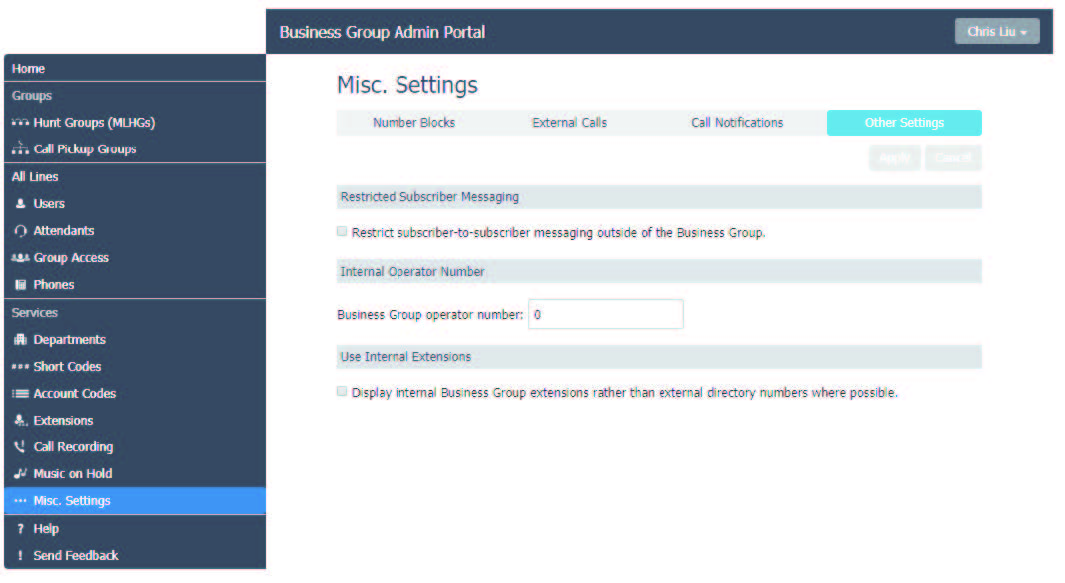
On the Other Settings screen, the BG Admin can configure the following options.
- Restricted Subscriber Messaging - set whether members of this Business Group can send messages only to other members of the same Business Group.
- Internal operator number - enter the number used to access this Business Group's operator.
- Use Internal extensions - choose whether or not Customer Portal displays the Business Group extension number associated with a directory number where possible.
Working with Business Services
The following are just a few examples of the settings you can adjust in the Users, Attendants and Phones screens:
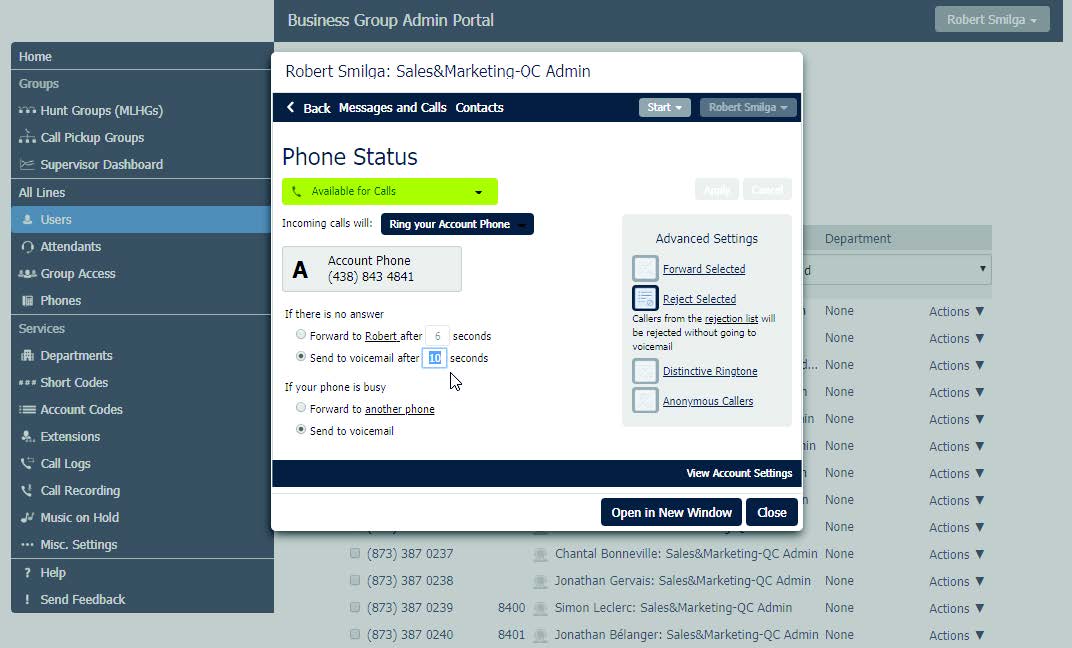
Users
Select the desired user, and then clicking on Incoming calls will:
- Ring your phones together (simultaneously ring your phone with another)
- Forward to another phone (forward your calls to another phone)
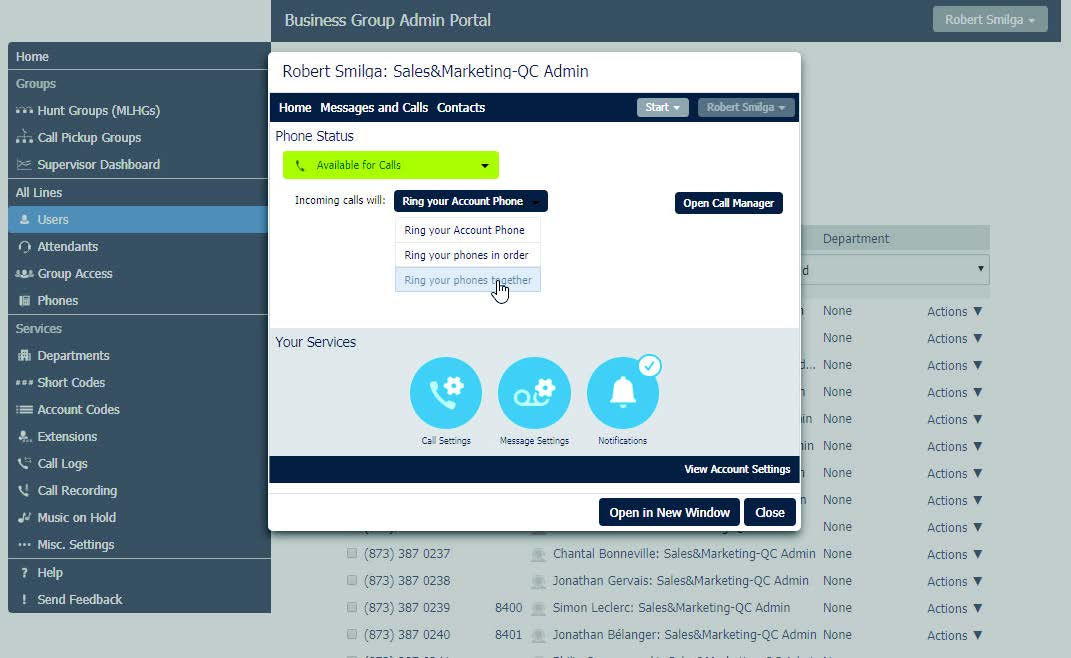
Open Call Manager, then Send to voicemail after (adjust the number of seconds before your extension goes to VM (1 ring = 5 seconds)
Call Settings
Change the internal name for each phone in the field after “If not withheld, signal my name as”
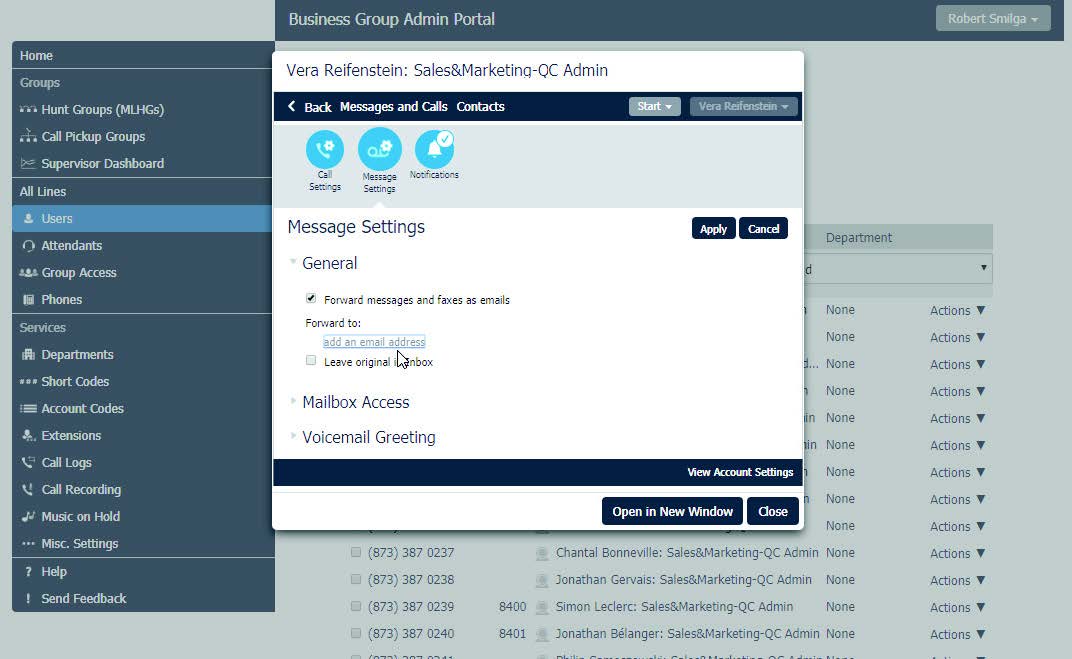
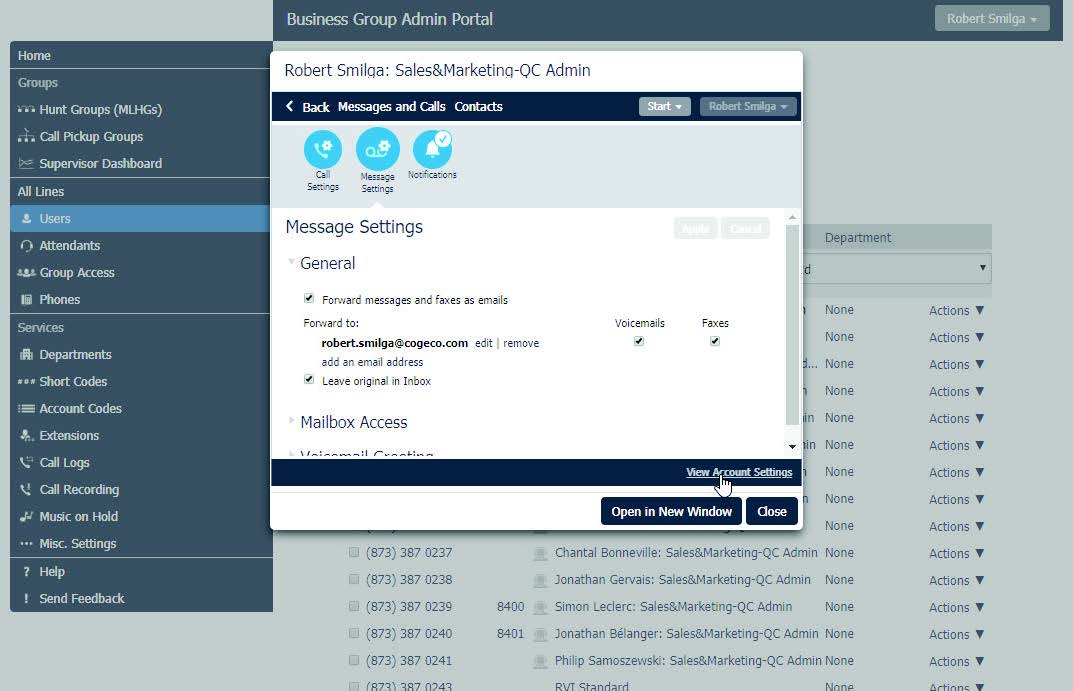
Message Settings
- Forward messages and faxes as emails (add/change voicemail to email)
- View Account Settings, then Change Voicemail PIN (change voicemail password)
Attendants
Select the desired attendant, and then click:
- Open Attendant Settings
- Main and then Switch to using a single menu (i.e. NO SCHEDULING – Easy Attendant)
- You can change attendant recordings remotely
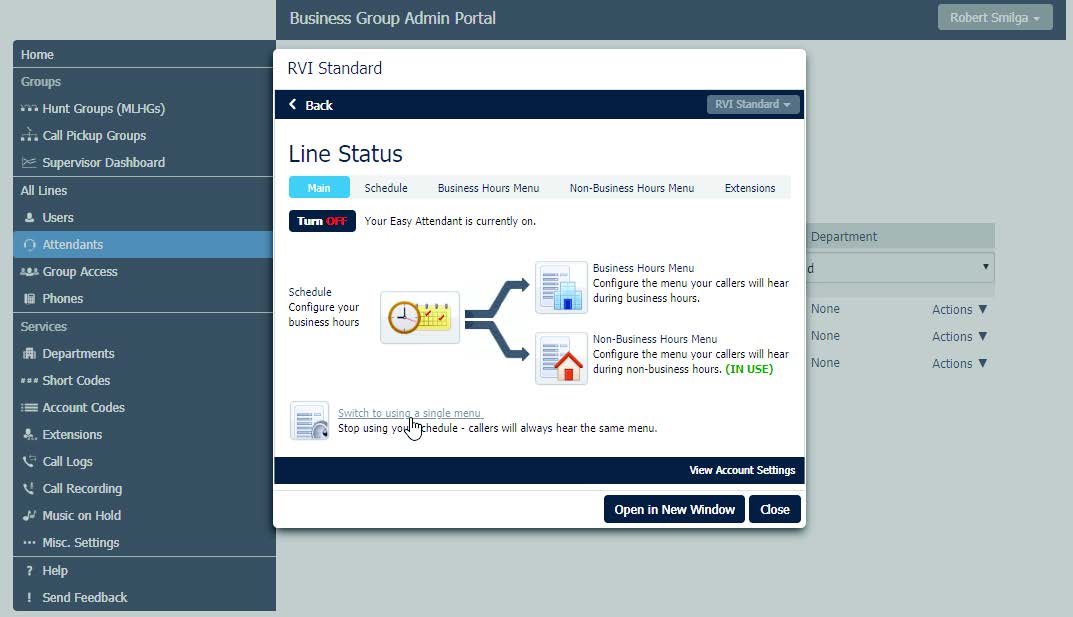
- Line Status screen
- Schedule (change the scheduling for your attendant if applicable)
- Business/Non-Business Hours Menu (Easy Attendant)
- Change the key assignment (ex: press 1 goes to reception ext 8400)
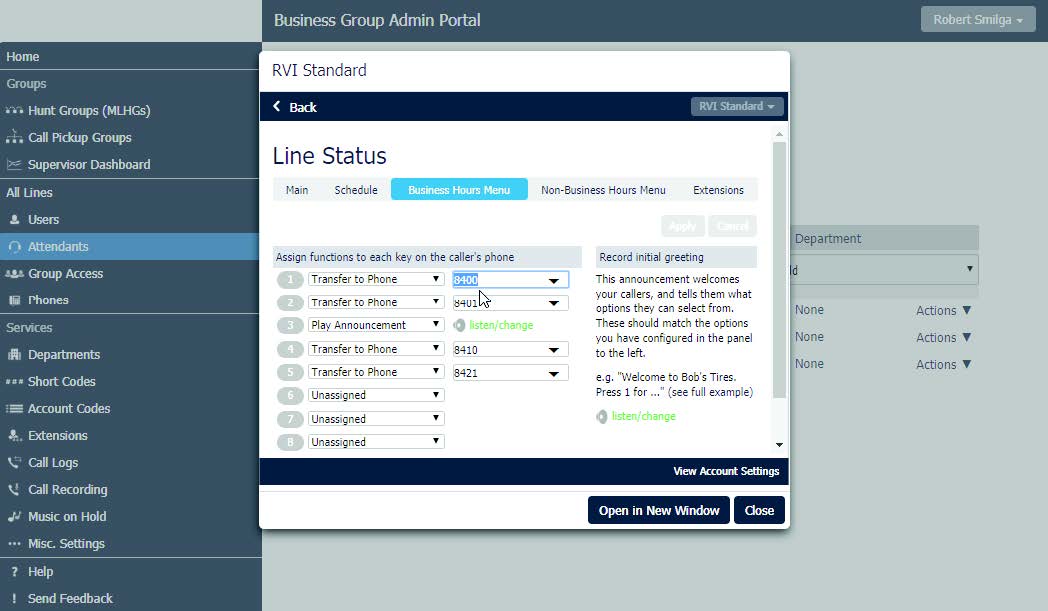
- Change the key assignment (ex: press 1 goes to reception ext 8400)
- Announcements (you will only see this category if scheduling has been applied)
- Select one of the greetings (AH = After Hours Greeting, BH = Business Hours) and record/listen to greeting remotely
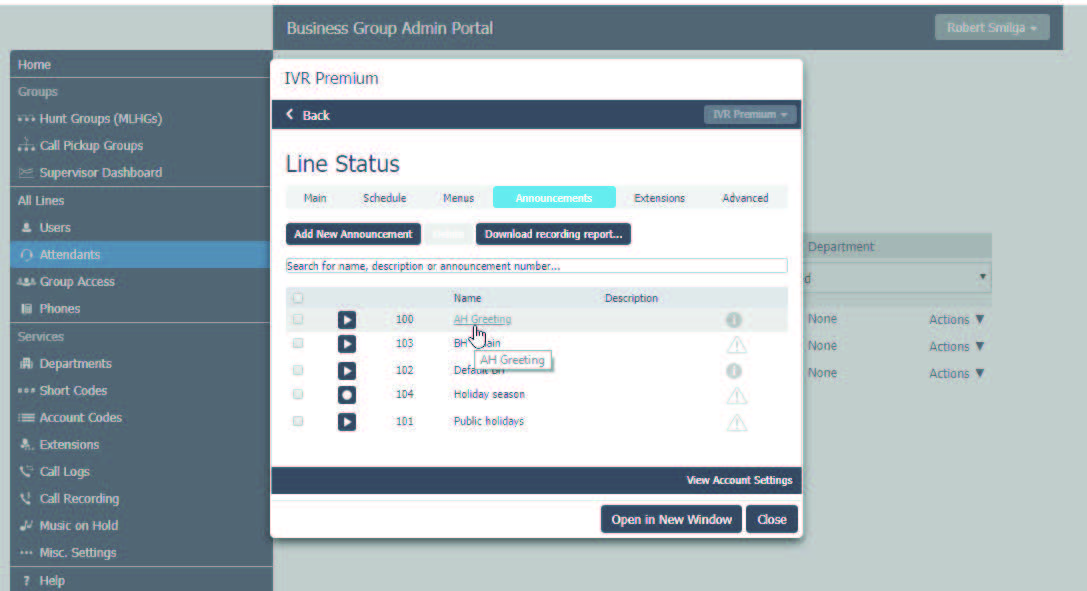
- Select one of the greetings (AH = After Hours Greeting, BH = Business Hours) and record/listen to greeting remotely
Phones
Select the desired phone, and then click:
- Actions > Configure Phone (new window will open)
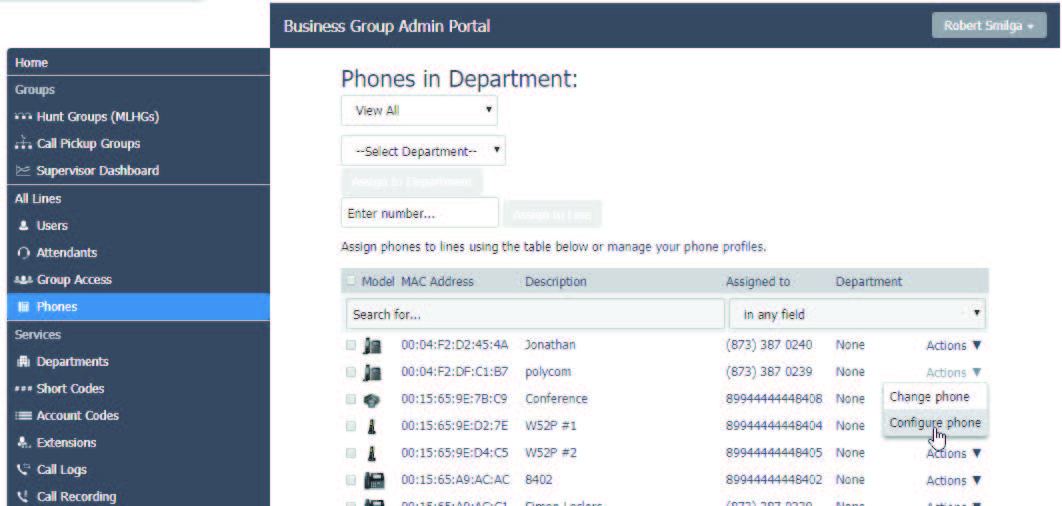
- Click “Edit”
- Programmable Keys – Line: this configures the 12 buttons on the left & right side of the screen. Select a key you want to configure (key 1 = button 1 top left corner, so keys 1-6 starting top left to bottom left, 7-12 top right to bottom right). Make sure when configuring keys to check the phone so that you’re not altering something that is crucial to that phone such as a main line extension etc. In this section you will most likely be selecting a blank key to:
- Assign a speed dial
- Soft Key Action = Speed Dial
- Number = Phone Number
- Label = Contact’s First/Last Name
- Add a monitoring key to monitor other phones in the business. This feature allows you to see when people are on the phone. If you’re not on a call it will also allow you to speed dial that person’s phone. If you’re on a live call and press their key, it will Blind Transfer your call to that person’s phone.
- Soft Key Action = Enhanced Monitored Extension
- Extension = (the extension you want to monitor, ex extension 20 is reception’s phone then you would put 20 here)
- Label = (the person’s/ department’s name, ex. Receptions Desk)
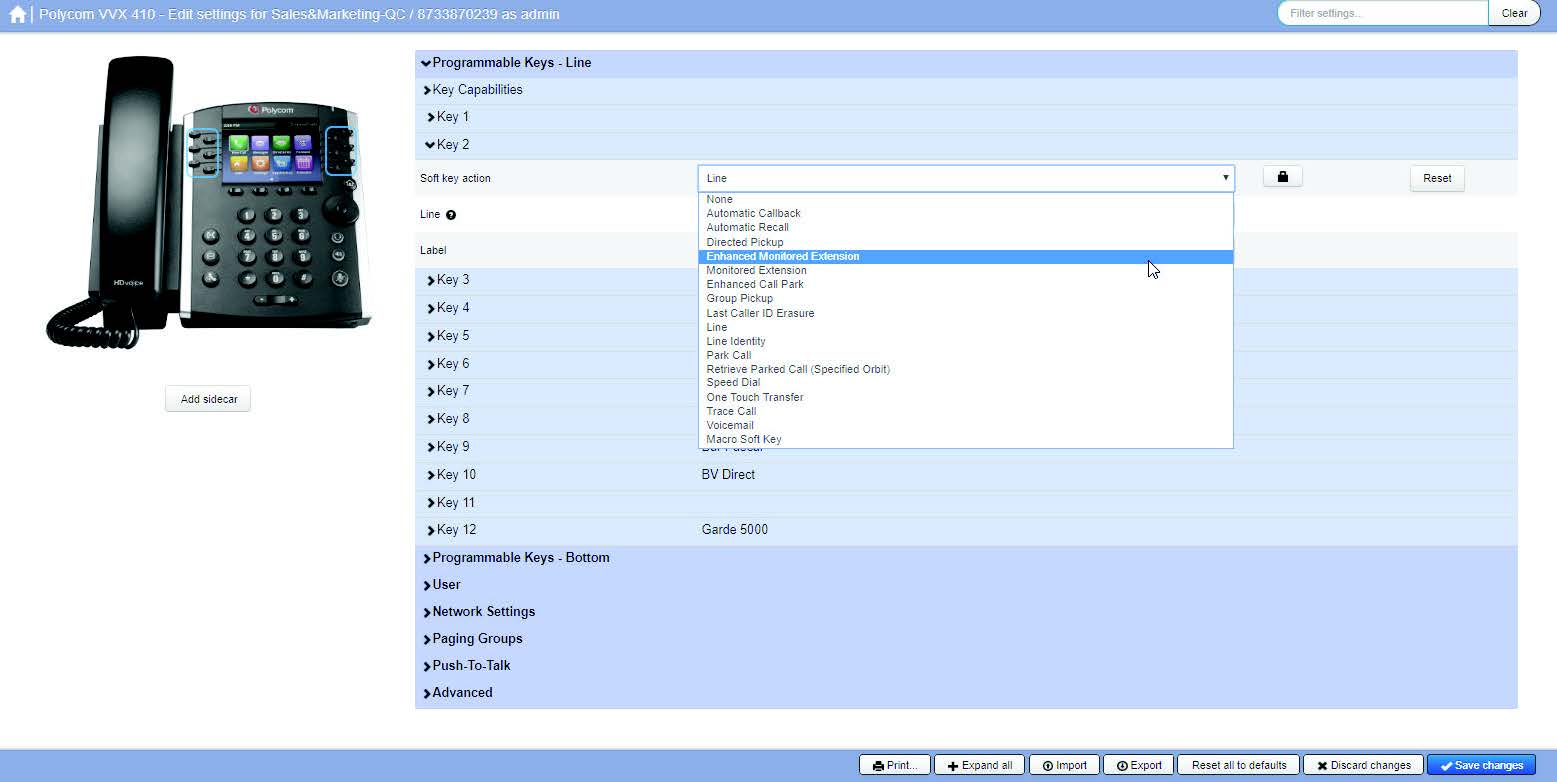
- Programmable Keys – Bottom (this section configures the 4 keys on the bottom of the screen)
- In this section you could customize what keys you have on the 4 buttons at the bottom of the screen. For example you could add a button that brings you directly to your “Directory.”
Music on Hold
- Click “Override”
- Upload new wave file
Three ways to find the best solutions for your business
-

We’re here Monday to Friday from 8:30 a.m. to 5:30 p.m. to suggest solutions and answer questions.
Call us now -

Fill out a short form with your information, and you will hear from us as soon as possible.
Go to callback form -

From paying bills to troubleshooting Wi-Fi, My Account is your go-to destination.
Log in now