-
Contact us
-
Log in
-
Webmail
- Select a province
- Ontario
- Québec
Polycom VVX 501 Business Media Phone Quick Start Guide
Getting Started With Hosted PBX
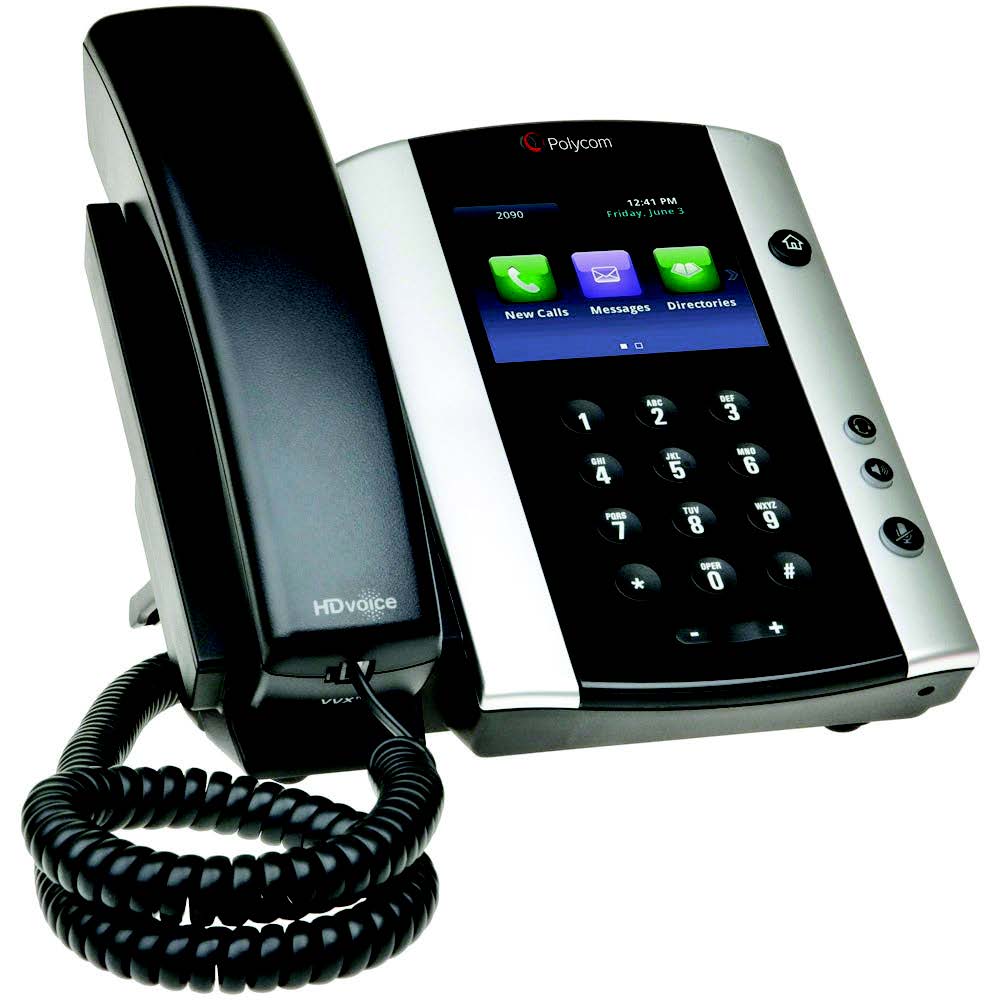
Welcome to Cogeco's Hosted PBX phone service. We designed the Polycom VVX® 501 Business Media Phone to streamline your communications with easy-to-use features and a touchscreen that's simple to navigate. Below, we'll walk you through all its features including setting up your voicemail, display screen and making conference calls. We've also included useful, time-saving tips throughout this guide.1
Setting Up Voicemail Greetings From Your Phone
- Dial feature code *98 or tap
from Lines, Calls, or Active Call view (see below)
- Enter a PIN of your choice (at least 6 digits)
- Re-enter PIN to confirm
- Upon hearing the system voice prompt, record your name
- Press # to confirm
- Setting up the Greetings
Choose one of the following options:
- Press 1 to record a personal greeting. Follow the voice prompts to complete the recording
- Press 2 to select system generated greetings that include your name. Greeting is automatically created
- Press 3 to select system generated greetings that include your phone number. Greeting is automatically created
- Press 4 to select system generated greetings that include both your name and telephone number. Greeting is automatically created
Press the pound key (#) to confirm.
After 3 unsuccessful attempts to log in, you will be locked out. Please contact technical support at 1-855-440-5602.
Accessing the Voice Portal from a remote location is not offered.
VoIP 9-1-1 Service features may differ from traditional wireline 9-1-1 services.
About the Touchscreen
Tap to select and highlight screen items. To scroll, touch the screen, and swipe your finger up, down, right, or left. To go back to a previous screen, tap Back.
Phone Views
Your phone has four main Views: Home, Calls, Active Call, and Lines view (the default).
You can access Home and Lines view at any time. If your phone has one or more calls, you can also access Calls or Active Call view.
To change Views:
- For Home press
- From Home view, press
to alternate between Home and Lines view, or, if you have one or more calls, between Home and either Calls or Active Call view
- To switch between Lines and either Calls or Active Call view, swipe the screen
Home View
Home view displays icons you can tap to access phone functions. Touch and hold the Page Indicator (shown next) to display more or fewer icons. You can also swipe the screen to display more icons.
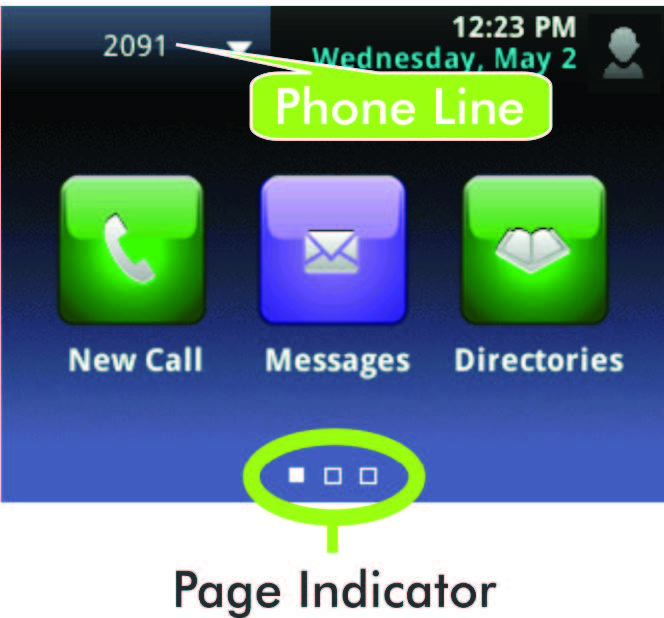
From Home view, tap the phone Line to display your phone Lines and Favorites (shown next). To go back, tap Close (shown next).

Lines View
Lines view displays phone Lines, Favorites and soft keys.
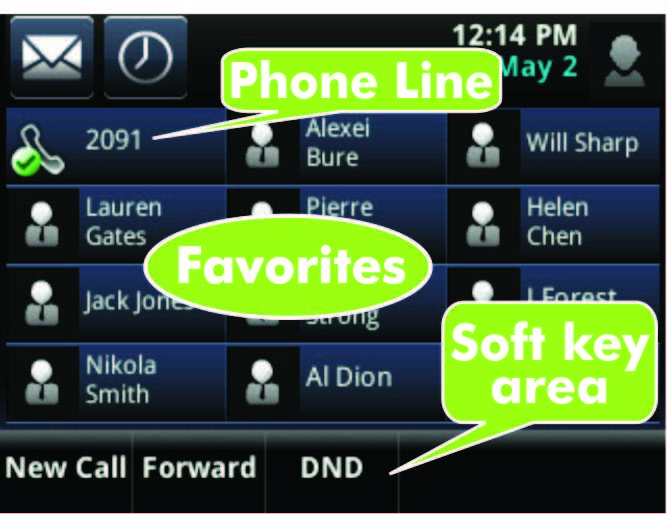
If your phone is idle, you can:
- Tap the phone Line to access the Dialer
- Swipe to switch between Lines view and the Browser (if enabled on your phone)
Active Call View
If your phone only has one call—and it’s active—you can access Active Call view.
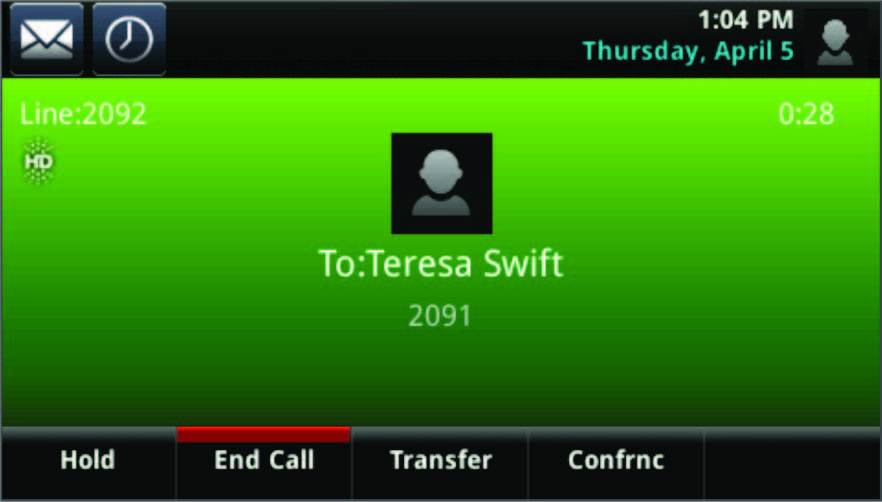
Calls View
If your phone has multiple calls, or one held call, you can access Calls view.
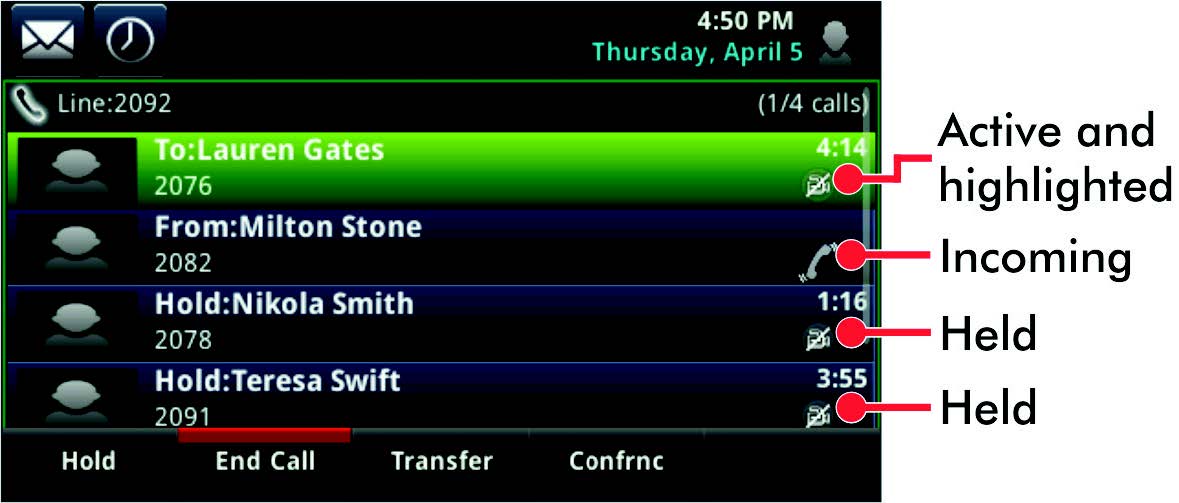
Call color indicates status:
- Dark green—Active call
- Dark blue—Incoming and held calls
- Bright green—Active call is highlighted
- Bright blue—Incoming or held call is highlighted
Use the up and down arrow keys to select a call (highlight it). The soft keys control the highlighted call.
Entering Data
Use the onscreen keyboard or the dial pad keys to enter information.
- To backspace, tap
- To use the onscreen keyboard, tap
- To type with the dial pad keys, press a dial pad key repeatedly to view the character options and stop to select. To type other characters, tap Encoding or Mode.
- When using the dial pad keys, use the 1, *, 0, and # keys.
About Calls
Only one call can be active at a time. You can use the handset, speakerphone, or headset for calls. During a call, you can change modes by picking up the handset, or by pressing or
.
Tips: Returning to Your Call
If you navigate away from your call(s), tap to see Active Call or Calls view again.
Placing Calls
Pick up the handset, or press or
.
Enter the phone number, and tap .
From Lines view: Tap the phone Line, enter the phone number, and tap .
From Home view: Tap New Call, enter the phone number, and tap .
Timesaver: Placing Calls Quickly
Tap a recent call or tap a contact’s phone number in the Contact Directory.
Answering Calls
To answer with the speakerphone, press or tap Answer.
To answer with the handset, pick up the handset. To answer with a headset, press .
To answer a new call while on an active call, tap Answer. The current call will be held.
Ending Calls
To end an active call, replace the handset, press , or press
. Or, tap End Call.
To end a held call, navigate to Calls view and highlight the held call. Tap Resume, and tap End Call.
Holding Calls
From Lines, Calls, or Active Call view, tap Hold. If you’re in Calls view, remember to highlight the call first.
To resume a held call, tap Resume from either Lines or Calls view.
Transferring Calls
From Lines, Calls, or Active Call view, tap Transfer, and call the other party. When you hear the ringback sound, or after you talk with the other party, tap Transfer.
Placing Conference Calls
Call the first party, and after the call connects, tap Confrnc. Then, dial and connect with the second party and tap Confrnc again.
From Lines or Calls view, you can:
- Tap Hold to hold all participants
- Tap End Call to remove yourself from the call, but keep the other participants connected
- Tap Split to end the conference and hold all participants
Timesaver: Placing Conference Calls
If you have an active and held call, tap Join to set up a conference.
Viewing Recent Calls
To view your Recent Calls list, tap Directories from Home view, and tap Recent Calls.
From the Recent Calls list, tap to sort and order calls, tap p
to only display certain calls, or tap a call record to call the person.
Timesaver: Viewing Recent Calls
Tap from Lines, Calls, or Active Call view.
Tip: Saving Recent Callers To Your Directory
From your Recent Calls list, tap next to the call, and tap Save. Enter additional information and tap Save.
Listening to Voicemail
Tap Messages from Home view, and tap Message Center. Tap Connect and follow the prompts.
Timesaver: Accessing Your Message Center
Tap from Lines, Calls, or Active Call view.
Mute the Microphone
During a call, press so other parties can’t hear you. To disable Mute, press
icon again.
Using Do Not Disturb
If you have a service that supports Do Not Disturb (DND), you can enable or disable ringing.
To enable or disable ringing, tap DND from Home or Lines view. When Do Not Disturb is enabled, , displays in the status bar.
Adjusting Volume
To change call volume, press during a call. To change the ringer volume, press
when the phone is idle or ringing.
Updating Ringtones
To change the incoming call ringtone, tap Settings from Home view, and tap Basic > Ring Type. Tap the ringtone you want.
To set a ringtone for a contact, navigate to your Contact Directory and tap the contact.
Tap to update the contact’s Ring Type and tap Save.
Auto Attendant Greetings
Dial the Auto Attendant (AA) phone number (E.g. 51#, 52#, 53# provided by Cogeco).
Upon hearing the IVR Prompt, press/key-in *6.
Enter PIN followed by # (E.g. 1234#).
If entering the system for the first time, it will give you the option of choosing your PIN (a minimum of 4 digits is recommended). Re-enter the new PIN to confirm, followed by #.
To Record & Edit recordings for Business and Non-Business hours.
- Press 1 to change the configuration of your automated attendant
- Press 1 to turn on/off your automated attendant
- Press 2 to record or edit announcements used for your business-hours menu
- Press # to record your initial greeting
- When finished recording press #
- Press 1 to save the recording
- Press 2 to re-record/override
- Press 3 to exit
- Press 4 to continue recording
- Press 3 to record or edit announcements used for your non-business-hours menu
(Note: this option will be only available if you have your attendant configured by Cogeco to provide your callers with options during Non-Business hours)
- Press # to record your initial greeting
- When finished recording press #
- Press 1 to save the recording
- Press 2 to re-record/override
- Press 3 to exit
- Press 4 to continue recording
- Follow the voice prompts to complete the recording.
- Press the (*) button to return to the previous menu.
For use with Polycom® UC Software 4.1.3. Note that configurations vary and the screen displays used in this guide may not reflect those on your phone. See your system administrator for more information. For detailed information on how to use your phone, navigate to your phone Support page from the Business Media Phones Support page.
Three ways to find the best solutions for your business
-
We’re here Monday to Friday from 8:00 a.m. to 6:00 p.m. to suggest solutions and answer questions.
Call us now -
Fill out a short form with your information, and you will hear from us as soon as possible.
Go to callback form -
Book a meeting with your local Cogeco Account Executive for tailored solutions for your business.
Book a meeting

