 Log in
  Webmail
 Select the image that represents your TV interface
Select your Phone service
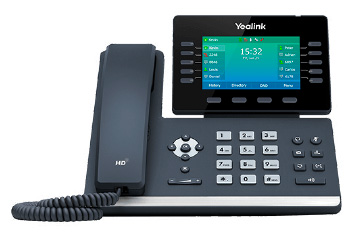
Yealink SIP-T54W Gigabit Colour IP Phone Quick Start Guide
Welcome to Cogeco's business phone service. This handy guide will take you through all of the Yealink SIP-T54W Gigabit Colour IP Phone features including setting up your voicemail, conference calls and customizable settings. We've also included useful, time-saving tips throughout this guide.
Getting Started with Managed Telephony
Setting Up Voicemail Greetings From Your Phone
- Dial feature code *98 or tap

- Enter a PIN of your choice (at least 6 digits)
- Re-enter PIN to confirm
- Upon hearing the system voice prompt, record your name
- Press # to confirm
- Setting up the Greetings
Choose one of the following options:- Press 1 to record a personal greeting. Follow the voice prompts to complete the recording
- Press 2 to select system generated greetings that include your name. Greeting is automatically created
- Press 3 to select system generated greetings that include your phone number. Greeting is automatically created
- Press 4 to select system generated greetings that include both your name and telephone number. Greeting is automatically created.
Press the pound key (#) to confirm.
After 3 unsuccessful attempts to log in, you will be locked out. Please contact technical support at [technical-phone].
Accessing the Voice Portal from a remote location is not offered.
VoIP 9-1-1 Service features may differ from traditional wireline 9-1-1 services.
Basic Call Features
Placing a Call
Using the handset:
- Pick up the handset.
- Enter the number, and then press the Send soft key.
Using the speakerphone:
- With the handset on-hook, press
 .
. - Enter the number, and then press the Send soft key.
Using the headset:
- With the headset connected, press
 to activate the headset mode.
 - Enter the number, and then press the Send soft key.
Tip:
During a call, you can alternate between the headset, hands-free speaker phone and handset modes by pressing the HEADSET key, the Speakerphone key or by picking up the handset. Headset mode requires a connected headset.
Answering A Call
- Using the handset: Pick up the handset.
- Using the speakerphone: Press .
- Using the headset: Press .
Tip:
You can reject an incoming call by pressing the Reject soft key.
Ending A Call
- Using the handset: Hang up the handset or press the End Call soft key.
- Using the speakerphone: Press or the End Call soft key.
- Using the headset: Press the End Call soft key.
Redial
- Press
 to enter the Placed Call list, press
  or
or  to select the desired entry, and then press or the Send soft key.
 - Press twice when the phone is idle to dial out the last dialed number.
Call Mute and Un-Mute
- Press
 to mute the microphone during a call.
 - Press again to un-mute the call.
Call Hold and Resume
To place a call on hold:
Press the ![]() or the Hold soft key during an active call.
or the Hold soft key during an active call.
To resume the call, do one of the following:
If there is only one call on hold, press ![]() button or the Resume soft key.
button or the Resume soft key.
If there is more than one call on hold, press ![]() or
or ![]() to select the desired call, and then press
to select the desired call, and then press ![]() or the Resume soft key.
or the Resume soft key.
Call Transfer
You can transfer a call in the following ways:
Blind Transfer
- Press
 or the Transfer soft key during an active call. The call is placed on hold.
 - Enter the number you want to transfer to.
- Press or the Transfer soft key.
Semi-Attended Transfer
- Press button or the Transfer soft key during an active call. The call is placed on hold.
- Enter the number you want to transfer to, and then press
 .
. - Press button or the Transfer soft key when you hear the ring-back tone.
Attended Transfer
- Press button or the Transfer soft key during an active call. The call is placed on hold.
- Enter the number you want to transfer to, and then press .
- Press or the Transfer soft key when the second party answers.
Call Forward
- To enable call forwarding, dial feature code *72 followed by the number you want to forward your number to.
- To disable call forwarding, dial feature code *73.
Call Conference
- Press the Conference soft key during an active call.
- The call is placed on hold.
- Enter the number of the second party, and then press the Send soft key.
- Press the Conference soft key again when the second party answers.
- All parties are now joined in the conference.
- Press the End Call soft key to disconnect all parties.
Tip:
You can split the conference call into two individual calls by pressing the Split soft key.
Speed Dial
To configure a speed dial key:
- Press the Menu soft key when the phone is idle, and then select
- Features > DSS Keys.
- Select the desired DSS key, and then press the Enter soft key.
- Select Speed Dial from the Type field, select the desired line from the Account ID field, enter a label in the Label field and enter the number in the Value field.
- Press the Save soft key to accept the change.
To use the speed dial key:
Press the Speed Dial key to dial out the preset number.
Voice Message
The message waiting indicator on the idle screen indicates that one or more voice messages are waiting at the message center. The power indicator LED slowly flashes red.
To listen to voice messages:
- Press or the Connect soft key.
- Follow the voice prompts to listen to your voice messages.
Customizing Your Phone
Call History
- Press the History soft key when the phone is idle, press or to scroll through the list.
- Select an entry from the list, you can do the following:
- Press the Send soft key to call the entry.
- Press the Delete soft key to delete the entry from the list.
If you press the Option soft key, you can also do the following:
- Select Detail to view detailed information about the entry.
- Select Add to Contacts to add the entry to the local directory.
- Select Add to Blacklist to add the entry to the blacklist.
- Select Delete All to delete all entries from the list.
Contact Directory
To add a contact:
- Press the Directory soft key when the phone is idle, and then select All Contacts.
- Press the Add soft key to add a contact.
- Enter a unique contact name in the Name field and contact numbers in the corresponding fields.
- Press the Save soft key to accept the change.
To edit a contact:
- Press the Directory soft key when the phone is idle, and then select All Contacts.
- Press or to select the desired contact, press the Option soft key and then select Detail from the prompt list.
- Edit the contact information.
- Press the Save soft key to accept the change.
To delete a contact:
- Press the Directory soft key when the phone is idle, and then select All Contacts.
- Press or to select the desired contact, press the Option soft key and then select Delete from the prompt list.
- Press the OK soft key when the LCD screen prompts “Delete selected item?”.
Tip:
You can add contacts from call history easily. For more information, refer to Call History above.
Volume Adjustment
- Press
 during a call to adjust the receiver volume of the handset/speakerphone/headset.
 - Press when the phone is idle to adjust the ringer volume.
Ringtones
- Press the Menu soft key when the phone is idle, and then select Basic > Sound> Ringtones.
- Press or to select Common or the desired account and then press the Enter soft key.
- Press or to select the desired ringtone.
- Press the Save soft key to accept the change.
Auto Attendant Greeting
- Dial the Auto Attendant (AA) phone number (E.g. 51#, 52#, 53# provided by Cogeco)
- Upon hearing the IVR Prompt, press/key-in *6
- Enter PIN followed by # (E.g. 1234#)
- If entering the system for the first time, it will give you the option of choosing your PIN (a minimum of 4 digits is recommended). Re-enter the new PIN to confirm, followed by #.
To Record & Edit recordings for Business and Non-Business hours:
- Press 1 to change the configuration of your automated attendant
- Press 1 to turn on/off your automated attendant
- Press 2 to record or edit announcements used for your business-hours menu
- Press # to record your initial greeting
When finished recording press #
- Press 1 to save the recording
- Press 2 to re-record/override
- Press 3 to exit
- Press 4 to continue recording
- Press 3 to record or edit announcements used for your non-business-hours menu
(Note: this option will be only available if you have your attendant configured by Cogeco to provide your callers with options during Non-Business hours) - Press # to record your initial greeting
When finished recording press #
- Press 1 to save the recording
- Press 2 to re-record/override
- Press 3 to exit
- Press 4 to continue recording
Follow the voice prompts to complete the recording.
Press the (*) button to return to the previous menu.
Three ways to find the best solutions for your business
-

We’re here Monday to Friday from 8:00 a.m. to 6:00 p.m. to suggest solutions and answer questions.
Call us now -

Fill out a short form with your information, and you will hear from us as soon as possible.
Go to callback form -

From paying bills to troubleshooting Wi-Fi, My Account is your go-to destination.
Log in now